Believe it or not, spring officially starts this month! The first day of spring is March 19, and after so much thinking about and planning for our dye garden, we are feeling really ready for some actual planting!
This is also the time of year where, depending on your culture or religion, you may celebrate the reawakening of life and possibly Easter by coloring eggs.
There are all kinds of traditions around coloring eggs. In the United States, one common way people color eggs is with egg kit tablets or liquid food coloring, usually made from synthetic food dye, mixed with warm water and vinegar. One advantage of this method is that the colors affect the eggshell pretty quickly and it only takes a few minutes to achieve a reasonably bright color. But if you generally avoid consuming synthetic food coloring, and you plan to eat the eggs, you might want to consider using natural dyes. It’s also just fun to see how you can color eggs with plants.
To dye your eggs, you can purchase natural dye egg kits. The colors don’t show up quite as quickly or as brightly as the synthetics, but they’re beautiful and the process is active and can be completed within an hour or so. Dyeing with the foods themselves is fun, in part because it shows you a process you might have never thought possible, but it requires a lot of waiting. Usually, jars of eggs will need to sit in colored water in your refrigerator at least overnight and possibly up to several days to achieve much color.
How to Color Eggs With Food
-
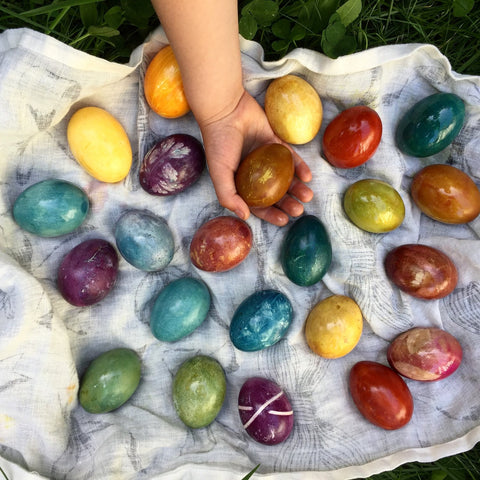
Our friend, Kelly, has been experimenting with natural egg dyeing for the last several years. She has included her processes and opinions here, here and here. When using whole food for coloring eggs, in her experience, beets, onion skins, dried hibiscus, frozen blueberries, and turmeric work well. Experiment to see what works for you. You can also expand the colors you get depending on if you start with white or brown eggs. (above photo taken by Kelly)
-
This tutorial for creating the dyes is great (and frankly, so beautiful to look at): https://www.designsponge.com/2015/04/diy-naturally-dyed-easter-eggs.html
-
Here is a tutorial based on tea: https://www.traditionalmedicinals.com/articles/diy/holiday-egg-dyeing-with-herbs/
Stains vs. Dyes
First, a quick note about stains versus dyes. Currently we are experiencing a resurgence in interest in natural dyeing which, coupled with the ease of sharing info via social media, means that there is an abundance of people experimenting with various plants and food waste as dyestuffs. As with most information found on the internet (and even found in books!) it is important to consider your source. If you are looking to create colors on fibers that will last for decades, even generations, get your information from natural dyers that are in alignment with that goal. If you are interested in playing, using food waste, and are comfortable re-dyeing items that fade quickly then find find a natural dyer that is also interested in those things. If you can't tell what their goals are with their dyeing then look to see if they evaluate and share information on the wash- and light-fastness of the dyes they are using. If they do, then that can be a good indication that they are concerned with the durability of their dyeing. If they don't, then you may need to dig deeper to discover their natural dyeing goals.
Why mention this when we are talking about dyeing eggs? Well, most of the dyes recommended to dye eggs don't make for lasting fiber dyes. The exception is onion skins. Purple cabbage, beets, blueberries, and water from cooked black beans are all stains when used on mordanted fibers.

First Wave of Planting
Now on to planting! Depending on where you live, it might be time to start planting your seeds! You want to start your seeds about 6 weeks before you’ll be ready to move them outside. So 6 weeks before the last frost, if you live in a place that frosts. You can check last frost predictions by zip code here. You’ll want to prepare your growing medium, flats, and a sunny spot (or grow lamp!) to get your seeds going. Be sure to label your flat(s) with what you planted and the date. You can use anything for the label (you can even just write on a popsicle stick), but make sure your label is in (or stuck to) the flats themselves. If you live in a place where you can start your seeds outdoors, you’ll still want to label what you planted where, and when. If you’re planting outdoors, you may also want to cover your beds or planters with fine mesh to keep birds, squirrels, and other creatures from digging up and eating your seeds.
Generally the key to successful seed starting, indoors or out, is keeping your seeds evenly moist (not soggy!). This is why most indoor seed starting kits come with greenhouse lids. Once the seeds have germinated and developed their first set of true leaves then they tend to be a bit hardier. You can then start the process of 'hardening off' your seedlings by taking them outside during the day and placing them in a protected spot being sure that they still have enough water and dappled sun. Regardless it's important to wait to until the threat of frost has passed to plant your seedlings outside.
Here are a couple of great guides to get you started: https://www.almanac.com/content/starting-seeds-indoors & https://www.seedsavers.org/starting-seeds
March - Dye It Yourself: Stains vs. Dyes and First Wave Planting!
Believe it or not, spring officially starts this month! The first day of spring is March 19, and after so much thinking about and planning for our dye garden, we are feeling really ready for some actual planting!
This is also the time of year where, depending on your culture or religion, you may celebrate the reawakening of life and possibly Easter by coloring eggs.
There are all kinds of traditions around coloring eggs. In the United States, one common way people color eggs is with egg kit tablets or liquid food coloring, usually made from synthetic food dye, mixed with warm water and vinegar. One advantage of this method is that the colors affect the eggshell pretty quickly and it only takes a few minutes to achieve a reasonably bright color. But if you generally avoid consuming synthetic food coloring, and you plan to eat the eggs, you might want to consider using natural dyes. It’s also just fun to see how you can color eggs with plants.
To dye your eggs, you can purchase natural dye egg kits. The colors don’t show up quite as quickly or as brightly as the synthetics, but they’re beautiful and the process is active and can be completed within an hour or so. Dyeing with the foods themselves is fun, in part because it shows you a process you might have never thought possible, but it requires a lot of waiting. Usually, jars of eggs will need to sit in colored water in your refrigerator at least overnight and possibly up to several days to achieve much color.
How to Color Eggs With Food
Stains vs. Dyes
First, a quick note about stains versus dyes. Currently we are experiencing a resurgence in interest in natural dyeing which, coupled with the ease of sharing info via social media, means that there is an abundance of people experimenting with various plants and food waste as dyestuffs. As with most information found on the internet (and even found in books!) it is important to consider your source. If you are looking to create colors on fibers that will last for decades, even generations, get your information from natural dyers that are in alignment with that goal. If you are interested in playing, using food waste, and are comfortable re-dyeing items that fade quickly then find find a natural dyer that is also interested in those things. If you can't tell what their goals are with their dyeing then look to see if they evaluate and share information on the wash- and light-fastness of the dyes they are using. If they do, then that can be a good indication that they are concerned with the durability of their dyeing. If they don't, then you may need to dig deeper to discover their natural dyeing goals.
Why mention this when we are talking about dyeing eggs? Well, most of the dyes recommended to dye eggs don't make for lasting fiber dyes. The exception is onion skins. Purple cabbage, beets, blueberries, and water from cooked black beans are all stains when used on mordanted fibers.
First Wave of Planting
Now on to planting! Depending on where you live, it might be time to start planting your seeds! You want to start your seeds about 6 weeks before you’ll be ready to move them outside. So 6 weeks before the last frost, if you live in a place that frosts. You can check last frost predictions by zip code here. You’ll want to prepare your growing medium, flats, and a sunny spot (or grow lamp!) to get your seeds going. Be sure to label your flat(s) with what you planted and the date. You can use anything for the label (you can even just write on a popsicle stick), but make sure your label is in (or stuck to) the flats themselves. If you live in a place where you can start your seeds outdoors, you’ll still want to label what you planted where, and when. If you’re planting outdoors, you may also want to cover your beds or planters with fine mesh to keep birds, squirrels, and other creatures from digging up and eating your seeds.
Generally the key to successful seed starting, indoors or out, is keeping your seeds evenly moist (not soggy!). This is why most indoor seed starting kits come with greenhouse lids. Once the seeds have germinated and developed their first set of true leaves then they tend to be a bit hardier. You can then start the process of 'hardening off' your seedlings by taking them outside during the day and placing them in a protected spot being sure that they still have enough water and dappled sun. Regardless it's important to wait to until the threat of frost has passed to plant your seedlings outside.
Here are a couple of great guides to get you started: https://www.almanac.com/content/starting-seeds-indoors & https://www.seedsavers.org/starting-seeds