News
May - Dye-It-Yourself: Mordanting

It’s May! Some of our dye gardens are growing, others are still getting ready. Are you taking photos of your garden process? If so, we’d love to see them. You can always post them on social media, tagging @sinceresheep and using the hashtag #sinceresheepdiy, or if you’re not on social media, you can email us. We are so excited to share in your garden joy!
As we continue our year-long Dye-It-Yourself series, there might be no better topic for May than mordanting. Mordanting an important step in the natural dye process, and it’s something you can do while you wait for your garden to grow. And if you'd like to skip this step completely I have listed some mordanted Cormo yarn so you can get straight to the dyeing!
But what is mordant, and why is it important to the natural dye process? Mordant is a substance that is used to set or bind dyes to plant fibers (like cotton or linen) or protein fibers (like silk or wool) by forming a chemical bridge between the dye and the fiber. Without a mordant, natural dyes won’t stick as effectively to plant or protein fibers. Mordants are often made from minerals, although tannins can also be used in the mordanting process with cellulose. Your choice of mordant--whether it be Alum, Copper, Iron, or Tannins--will affect the ultimate color of the dye you use. For this project, we recommend using Alum (Potassium Aluminum Sulfate) as a mordant for your protein fiber yarns.
There’s no need to wait to mordant your yarn, either! Planning ahead and getting your mordanting done before you’re ready to dye can be smart. If you do this work ahead of time, you won’t be trying to fit it in when your plants are ready for harvest and dyeing.
Whenever you start the mordanting process, you probably want to start your Dyer’s Notebook. In your notebook, you can write down what yarn you are using, what mordant you’re using, and any other things you want to remember during the dyeing process.
Here’s the mordanting process we recommend for protein yarn:
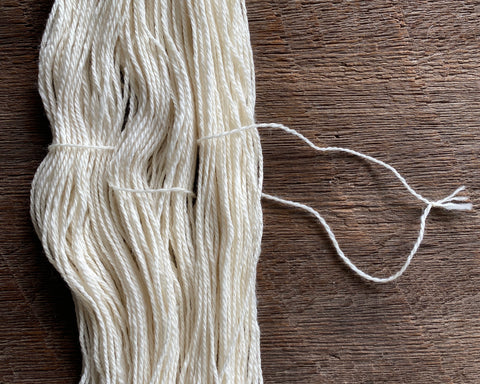
- Step 1 – ‘Dye-tie’ your yarn. – Using un-dyed waste yarn, loosely tie your skein of yarn in 2 places using a figure eight. Also check to see how the ends of the skein were tied and re-tie loosely if necessary. You want to leave lots of room so the ties don’t restrict the dye.
- Step 2 – Weigh your yarn. – Before you get your yarn wet, weigh your skeins in grams. If you don’t have a scale but the yarn was labeled with a weight, use that figure. Be sure to write this number down.
- Step 3 – Scour your yarn. – Either fill your sink or your top-loading washing machine with hot water. Once you have the right amount of water, add a few drops of dish soap and submerge your yarn in the water. Leave the yarn for at least a half an hour before you either spin it out or gently squeeze it out. If there is too much residual soap in the yarn, repeat this process omitting the soap on the second round. Be gentle; you want to avoid agitating the yarn.
- Step 4 – Mordant your yarn. – Multiply the total weight of your yarn by 15% to figure out the amount of Alum you need for mordanting. Weigh or measure the amount of Alum into a measuring cup. Dissolve the Alum in boiling water. Fill your dye-dedicated stainless steel or enamel pot with enough cold water to cover your yarn and add your dissolved mordant. Place the yarn in the pot and slowly heat, bringing to right below a simmer. Ideally your yarn should be at this temperature for about an hour. Turn off the heat and let your yarn sit for a minimum of an hour, or overnight.
- Step 5 – Rinse your yarn. – Wearing gloves, remove your yarn from the mordant and gently squeeze out excess liquid. Fill up your sink or top-loading washing machine with cold water and put your mordanted yarn in for a very brief soak to rinse off any excess mordant. Spin out or gently squeeze out your yarn. Your yarn is now ready to dye!
Resources for where to buy alum:
Books and websites with info about mordanting:
- The Art & Science of Natural Dyes by Joy Boutrup & Catherine Ellis
- The Modern Natural Dyer by Kristine Vejar
- Maiwa's guide to natural dyes
Third Wave of Planting
This month is also our third and final wave of planting! If you haven’t yet planted your garden, now is the time.
April - Dye-It-Yourself: Scouring and Tools
Happy April! We hope spring is treating you well so far and that you and your loved ones are healthy. This month, in Dye-It-Yourself, we’re going to talk about scouring and tools, so you’ll be ready to dye when your plants are!

Tools
We really feel that it is best practice to have tools that are used only for dyeing and that they aren’t mixed in with your food pots, utensils, and measuring cups. Of course you can go out and buy new but many of these items can be found readily at second hand shops and garage sales so you might start there!
Pots - In natural dyeing we use metals as mordants and to modify the colors resulting from various dyes so when you pick out pots for dyeing you need to be aware of what they are made of. We use only stainless steel for our dyeing but another option is enamelware that is marketed as canning pots. These are iron pots that are coated in enamel and non-reactive like stainless steel as long as they don’t get pitted. If you find an enamelware pot that is pitted (you can see the enamel has worn off and maybe see some rust forming where the iron is exposed) you can still use it to make mini dye bath in canning jars (more on this later).
The size of pot you pick is wholly dependent on how much dyeing you are going to be doing. You want a pot that is big enough that your yarn or fabric has room to move around freely.
Measuring - It is really handy to invest in a scale for dyeing. It can be an electronic scale or a triple beam balance scale - whichever you prefer. Having a glass measuring cup can also come in handy.

Utensils - I find it is really handy to have a few stainless steel spoons, a whisk, and a pair of tongs in my dyeing kit.
Kettle - You'll need some way to heat water and either an electric kettle or a stovetop one can be really handy.
Misc. - Glass canning jars in a variety of sizes are great to have in your dyeing kit. You can store dried dyestuffs, dye yarn or fabric, extract dyes, or dissolve mordants in them. Feel free to use clean pickle and jam jars instead of going out and buying new canning jars! Plastic yogurt cups, both big and small, can also be handy.
It’s also great to have some rags at hand to sop up spills and a dyeing notebook on hand to make notes.
Preparing your yarn
First thing you need to do is weigh your yarn and make a note of how much it weighs.
Second if your yarn isn't already in a skein you are going to want to make it into a skein. Once your yarn is in skein form you will need to make sure it is tied in 4 place around the skein very, very loosely.

Scouring
Either fill your sink or your top-loading washing machine with hot water. Once you have the right amount of water to completely submerge your yarn add a few drops of dish soap and submerge your yarn in the water. Leave the yarn for at least a half an hour before you either spin it out or gently squeeze it out. If there is too much residual soap in the yarn repeat this process omitting the soap on the second round. Be gentle; you want to avoid agitating the yarn.
Since we aren't ready to talk about mordanting quite yet you can either wait and scour your yarn right before you mordant or let it dry out and mordant at a later date.
Planting (more?) Seeds

Depending on where you live this month might be the perfect time to start your seeds indoors if you are in a colder climate. Check your calendar, the frost predictions, and see if this is you. If you are, it’s time to plant! You can refer to the previous posts for tips.
For those of us in warmer climates now might be a great time to get your first round of seeds hardened off and maybe start a second round of seeds after you've planted out your first round.
March - Dye It Yourself: Stains vs. Dyes and First Wave Planting!
Believe it or not, spring officially starts this month! The first day of spring is March 19, and after so much thinking about and planning for our dye garden, we are feeling really ready for some actual planting!
This is also the time of year where, depending on your culture or religion, you may celebrate the reawakening of life and possibly Easter by coloring eggs.
There are all kinds of traditions around coloring eggs. In the United States, one common way people color eggs is with egg kit tablets or liquid food coloring, usually made from synthetic food dye, mixed with warm water and vinegar. One advantage of this method is that the colors affect the eggshell pretty quickly and it only takes a few minutes to achieve a reasonably bright color. But if you generally avoid consuming synthetic food coloring, and you plan to eat the eggs, you might want to consider using natural dyes. It’s also just fun to see how you can color eggs with plants.
To dye your eggs, you can purchase natural dye egg kits. The colors don’t show up quite as quickly or as brightly as the synthetics, but they’re beautiful and the process is active and can be completed within an hour or so. Dyeing with the foods themselves is fun, in part because it shows you a process you might have never thought possible, but it requires a lot of waiting. Usually, jars of eggs will need to sit in colored water in your refrigerator at least overnight and possibly up to several days to achieve much color.
How to Color Eggs With Food
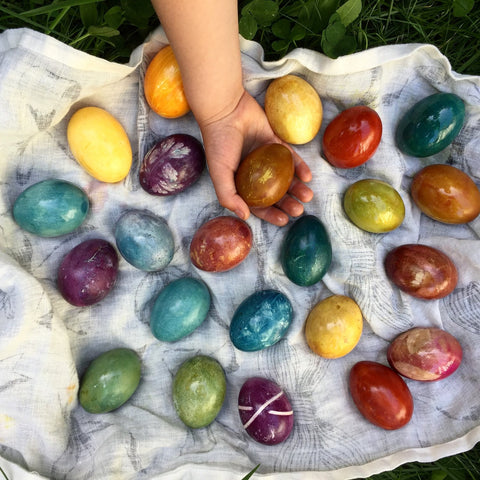
- Our friend, Kelly, has been experimenting with natural egg dyeing for the last several years. She has included her processes and opinions here, here and here. When using whole food for coloring eggs, in her experience, beets, onion skins, dried hibiscus, frozen blueberries, and turmeric work well. Experiment to see what works for you. You can also expand the colors you get depending on if you start with white or brown eggs. (above photo taken by Kelly)
- This tutorial for creating the dyes is great (and frankly, so beautiful to look at): https://www.designsponge.com/2015/04/diy-naturally-dyed-easter-eggs.html
- Here is a tutorial based on tea: https://www.traditionalmedicinals.com/articles/diy/holiday-egg-dyeing-with-herbs/
Stains vs. Dyes
First, a quick note about stains versus dyes. Currently we are experiencing a resurgence in interest in natural dyeing which, coupled with the ease of sharing info via social media, means that there is an abundance of people experimenting with various plants and food waste as dyestuffs. As with most information found on the internet (and even found in books!) it is important to consider your source. If you are looking to create colors on fibers that will last for decades, even generations, get your information from natural dyers that are in alignment with that goal. If you are interested in playing, using food waste, and are comfortable re-dyeing items that fade quickly then find find a natural dyer that is also interested in those things. If you can't tell what their goals are with their dyeing then look to see if they evaluate and share information on the wash- and light-fastness of the dyes they are using. If they do, then that can be a good indication that they are concerned with the durability of their dyeing. If they don't, then you may need to dig deeper to discover their natural dyeing goals.
Why mention this when we are talking about dyeing eggs? Well, most of the dyes recommended to dye eggs don't make for lasting fiber dyes. The exception is onion skins. Purple cabbage, beets, blueberries, and water from cooked black beans are all stains when used on mordanted fibers.

First Wave of Planting
Now on to planting! Depending on where you live, it might be time to start planting your seeds! You want to start your seeds about 6 weeks before you’ll be ready to move them outside. So 6 weeks before the last frost, if you live in a place that frosts. You can check last frost predictions by zip code here. You’ll want to prepare your growing medium, flats, and a sunny spot (or grow lamp!) to get your seeds going. Be sure to label your flat(s) with what you planted and the date. You can use anything for the label (you can even just write on a popsicle stick), but make sure your label is in (or stuck to) the flats themselves. If you live in a place where you can start your seeds outdoors, you’ll still want to label what you planted where, and when. If you’re planting outdoors, you may also want to cover your beds or planters with fine mesh to keep birds, squirrels, and other creatures from digging up and eating your seeds.
Generally the key to successful seed starting, indoors or out, is keeping your seeds evenly moist (not soggy!). This is why most indoor seed starting kits come with greenhouse lids. Once the seeds have germinated and developed their first set of true leaves then they tend to be a bit hardier. You can then start the process of 'hardening off' your seedlings by taking them outside during the day and placing them in a protected spot being sure that they still have enough water and dappled sun. Regardless it's important to wait to until the threat of frost has passed to plant your seedlings outside.
Here are a couple of great guides to get you started: https://www.almanac.com/content/starting-seeds-indoors & https://www.seedsavers.org/starting-seeds
February - Dye It Yourself: Seed Sources

Last month, we kicked-off our 2020 Dye-It-Yourself journey with some ideas on how to start thinking about and planning your dye garden. This month, we’re going to go a little deeper into what exactly we’re going to grow and how we think about sourcing seeds.
If you’ve had a garden before, you know that you can grow your garden from seeds or small, young plants called seedlings. Seeds themselves are pretty amazing. Think of a seed as a baby plant in a box, with its lunch. They can wait years (sometimes hundreds of years!) before they germinate, sprouting into plants. We’re starting our dye garden from seeds for three main reasons. First, we have plenty of time before the growing season begins. Second, starting plants from seeds allows us to really focus on the source of our plants and support companies that share our values. For example, when we choose to support seed companies that use only organic practices, we support earth- and people-friendly practices that benefit all of us. Third, few nurseries carry dye plants, so as a practical matter, if you’re going to grow dye plants, you’ll need to start them from seeds.
Our Top 5 Plants for a Home Dye Garden (with a short description, mostly from this source https://pfaf.org/user/Default.aspx)
- Dyer’s Chamomile (yellow): Anthemis tinctoria is an evergreen perennial that grows to about 2 ½ feet tall by 2 ½ feet wide. It is in leaf all year, in flower from July to August, and the seeds ripen from August to September. The species is hermaphrodite (meaning it has both male and female organs) and is pollinated by bees, moths, butterflies, flies, and beetles. It can grow in light (sandy), medium (loamy) and heavy (clay) soils and prefers well-drained soil. It grows in neutral and alkaline soils and can grow in very alkaline soils. It cannot grow in the shade. It prefers dry or moist soil. The plant can tolerate maritime exposure.
- Dyer’s Coreopsis (bronzy-yellow): Coreopsis tinctoria is an annual that grows to about 2 ½ feet tall by just over a half-foot wide. It is in leaf from April to November, in flower from June to September, and the seeds ripen from June to October. The species is hermaphrodite and is pollinated by bees. It is noted for attracting wildlife. It can grow in light (sandy) and medium (loamy) soils and prefers well-drained soil. It can grow in acid, neutral and alkaline soils. It cannot grow in the shade. It prefers dry or moist soil and can tolerate drought.
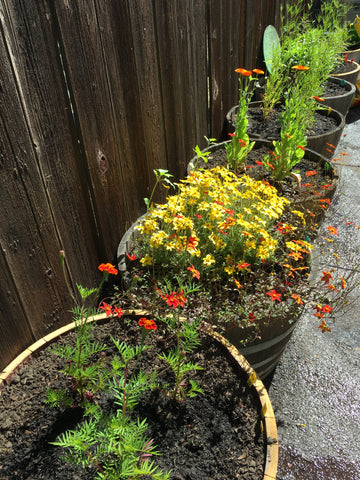
- Marigold (gold): Tagetes patula is an annual that grows to about 1 ½ feet tall by about a foot wide. It is frost tender and is in flower from July to October. The seeds ripen in September. The species is hermaphrodite (has both male and female organs) and is pollinated by insects. It is noted for attracting wildlife. It can grow in light (sandy), medium (loamy) and heavy (clay) soils, and it prefers well-drained soil that is dry or moist. It can grow in acidic, neutral, and basic soils. It cannot grow in the shade.

- Sulphur Cosmos (orange/yellow): Cosmos sulphureus (photo, above, courtesy of Grand Prismatic Seed) of is a prolific seed-producing annual herb considered native to Mexico and northern South America. It can grow to 6 feet tall, and it has very attractive heads of yellow flowers. It’s an annual in most growing zones, but can be a perennial in zones 9 and 10. It loves humid heat and hot dry conditions, and it will be fine in poor or sandy soil. More details on Cosmos flowers can be found here.
- Indigo (blue): Indigofera tinctoria is a perennial plant reaching a height of about 3-6 feet upon maturity. Branches are spreading or ascending and are often woody. The leaves are pinnate. In addition to being one of the major sources of deep blue dye, medicinally, it is used to treat a variety of illnesses. The plant is also used as a cover crop, and it also has a symbiotic relationship with certain soil bacteria that form root nodules and fix atmospheric nitrogen. It will grow in light (sandy), medium (loamy) and heavy (clay) soils and prefers well-drained soil. The soil can be acidic, neutral or basic (alkaline). It can grow in semi-shade (light woodland) or no shade. It prefers moist soil.

- Weld (clear yellow): Reseda luteola is a biennial growing to about 5 feet by 1 ½ feet. It is in flower from June to August, and the seeds ripen from August to September. The species is hermaphrodite and is pollinated by Bees and insects. The plant is self-fertile. It is noted for attracting wildlife. It can grow in light (sandy), medium (loamy) and heavy (clay) soils and prefers well-drained soil. And it can grow in soils that are acidic, neutral and alkaline (even very alkaline) soils. It cannot grow in the shade. It prefers moist soil.
Lots of options for yellow, right? Shades of yellow are the most accessible, widely available color from plants. Other colors can take longer or be more challenging to source. For example, shades of red have historically come from madder root, and it takes at least 3 years after planting madder before you can harvest roots for dyeing. Pink often comes from cochineal or lac, which are tiny insects, requiring different climate than is available in most of the United States. Though keep an eye out for nopal cactuses infested with cochineal in Southern California and throughout the SouthWestern US. We think you’ll be pleasantly surprised by the range of shades of yellow dye that these five plants provide. And if you have room for indigo, you’ll be able to achieve blue and maybe even green by overdyeing one of your yellows.
You will probably want to order your seeds this month, that way you’ll have them when it’s time to plant. Here are companies we wholeheartedly recommend for sourcing your seeds:
- Grand Prismatic Seed: James Young and Guy Banner are the co-owners and farmers of Grand Prismatic Seed. They are committed to growing high quality open pollinated seeds that can withstand the stresses associated with high desert crop production. One area they are focused on is natural dyes. You can find more information about the company, their practices, and their dye plant seeds on their website.
- Thyme Garden Herb Co.: This family-owned farm on the Oregon coast uses sustainable practices, free of pesticides, herbicides, and commercial fertilizers to grow their plants and seeds. They harvest the herbs and seeds by hand as they ripen to their fullest in an attempt to provide the seeds that have the best possible chance to germinate. Their specialty is herbs, and in the plant world, dye plants and herbs often overlap (Sulphur Cosmos is just one example of that overlap).
- Craig Wilkinson: Fibershed member who specializes in indigo and offers seeds.
- Graham Keegan: Seeds and resources available on natural dyeing, especially with indigo.
Feeling Impatient To Start Dyeing?
As exciting as it is to plan a dye garden, sometimes it can feel like the actual dyeing part just too far into the future. If you’re feeling eager to start dyeing now, start saving your avocado pits in a bag in the freezer. You can also start saving the papery brown or yellow onion skins you remove from your onions before cooking them. As long as they are dry, you don’t need to freeze those. We will talk more in later posts about how to use these materials to add color to wool or silk.
January - Dye-It-Yourself: Garden Planning

Happy New Year! We are so excited about what we have planned for you in 2020 here at Sincere Sheep. In addition to all of the usual goodness, including newsletters, Made Here Club shipments, classes, and shows, this month, we’re beginning a new year-long blog series: Dye-It-Yourself.
As you might imagine, we have so much DIY fun planned! We’ll be guiding you through this dyeing journey from the very beginning. We’ll assist you in planning a dye garden, selecting the seeds to grow, growing your plants (and suggesting fun food-based natural dye and stain projects to tide you over while you wait for your plants to grow), harvesting your dyestuffs, the actual dyeing itself, and finally, seed saving. We can all share photos of our progress, process, successes, and more on Instagram with the hashtag #sinceresheepdiy
This month, we’re starting to plan our garden, and we hope you’ll join us and start planning your own. We’ll suggest ways for you to start planning, as well as helpful resources if you’re excited to start reading more about natural dyes right now.
Find Your Growing Zone
Sincere Sheep is located in beautiful Napa, California. In our area, this is the time of year that’s cooler and wetter than in the summer months. Even though we don’t get terribly severe cold winter weather, we still observe growing seasons. This is the time of year when we think about our garden for the coming year. If you’re in the Northern Hemisphere, chances are the same is true for you.

The 2012 USDA Plant Hardiness Zone Map is the standard by which gardeners and growers can determine which plants are most likely to thrive at a given location. The map is based on the average annual minimum winter temperature, divided into 10-degree F zones. You can type in your zip code to determine what zone you are in. A good place to start planning any garden is to figure out your zone and maybe even begin to familiarize yourself with what kinds of plants grow best in your area.
Determine Your Garden Space
Some people have lots of space for planting, and others have room for only a few pots on a windowsill. Take a look at the space around you. What kind of sun do certain areas get? Where would plants thrive? As a rule of thumb most dye plants need at least half the day in sun and two-thirds generally is better. Begin to think about what could work for you.
Dreams and Reality
As you start to plan your garden, by all means, dream big. Think of all the things you might want to grow, how beautiful they will look, and all the amazing things you will dye. Maybe you’ve been wanting to do a garden for years, and this is the perfect opportunity! Or maybe it’s a great reason to finally get moving on those raised beds you’ve been contemplating. Make lists if you want! Maybe even draw color-coded diagrams of your dream garden, if that helps you find a vision that you love.
But keep in mind that growing and maintaining a garden of any kind, including a dye garden, takes resources, including time and space. It doesn’t have to be an expensive project, but chances are you will have to buy some seeds and buy or borrow some gardening tools if you don’t already have them. This reality check is not intended to dampen your enthusiasm. It’s merely a suggestion that If you’re new to keeping a garden, maybe limit yourself to 2-3 types of dye plants, and see how it goes this year. You’ll be weeding, watering, and engaging in related garden care over the growing season. You don’t want to spread yourself too thin or get to July and feel totally overwhelmed by all the plant children in need of attention.
Dye Plant Options

Don’t worry too much at this point about choosing which particular dye plants you will grow. Get a sense of what’s possible for you in your space. We’ll get into seed sourcing next month, but shades of yellow are the most widely available. We’ll be talking mostly about the following six plants in the coming year:
- Dyer’s coreopsis (bronzy-yellow)
- Dyer’s chamomile (yellow)
- Marigolds (gold)
- Sulphur Cosmos (orange/yellow)
- Weld (clear yellow)
- Indigo (blue)
Working Together
I know, I know. Some of you are thinking, “How could I possibly limit myself to 2-3 types of plants? I want more colors!” If this is you, consider cooperating with other people who are also excited about this project. If you can find a partner either in your region or outside of your region, you have the opportunity to widen your options for dyestuffs. For example, maybe your time, space, and location will allow you to grow Marigolds and Dyer’s Coreopsis. But you’re so excited to try indigo, and you have this terrible sinking feeling that you’ll be missing out. One way to assuage your FOMO is to find (or make!) a friend who’ll grow plants different from yours and will trade with you after harvest time. Start asking around to see who might want to do this project with you!
Resources For Learning About Natural Dyeing
As you begin to dream about your garden, you may find yourself wondering about more of the specifics around natural dyeing. Here are some suggestions for books and online resources that we respect, find accessible to the beginning natural dyer, and will help you create more lasting natural color on fiber. Some of these books are out of print but you can still find them. Also, remember that your library is a great resource for these books.
Books
A Dyer’s Garden, by Rita Buchanan (1995)
A Weaver’s Garden, by Rita Buchanan (1987)
Harvesting Color, by Rebecca Burgess (2011)
The Modern Natural Dyer, by Kristine Vejar (2015)
The Art and Science of Natural Dyes: Principles, Experiments, and Results, by Joy Boutrup & Catherine Ellis (2019)
A Garden to Dye For, by Chris McLaughlin (2014)
10 Plants for Color by Deepa Preeti Natarajan & Helen Krayenhoff
Online
https://www.fs.fed.us/wildflowers/ethnobotany/dyes.shtml
Turkey Red Journal: https://www.turkeyredjournal.com/
Graham Keegan: http://www.grahamkeegan.com/indigo-vat-basics
Ecotone Threads / Kori Hargreaves: http://www.ecotonethreads.com/
Catherine Ellis: https://blog.ellistextiles.com/
Fall is in the Air! | Time to work on cozy knits
The Napa Valley is a frenzy with harvest. Truck loads of gondolas are trundling up and down the valley delivering grapes to local wineries. It's a sure sign cooler weather - and the premiere crafting season - is on the way. It's also an exciting time for me because I have a Fall full of shows - which means I'll get to see you - after taking a hiatus over the summer months.
Lambtown This Weekend
Lambtown is a family friendly event held in Dixon, CA every year. For the second year this event will be open both Saturday & Sunday. Sincere Sheep is in booth #1 just like last year. I look forward to seeing you there.
Other Upcoming Shows
Another great event this Fall is Interweave Knitting Lab, October 31 - November 3, which is being held again in San Mateo, CA at the Marriott Hotel. There are still spaces available in classes (find more class information and registration here).
For the second year {Among Friends} yarn & pattern club kicks off the knitting season with two new clubs. We had a great time over the summer with Knitting Love Sewing, a yarn and project bag club. You can see the yarn and what people made in the {Among Friends} Ravelry group.

I hope this newsletter finds you well and crafting to your heart's content!
Sincerely,
Brooke